
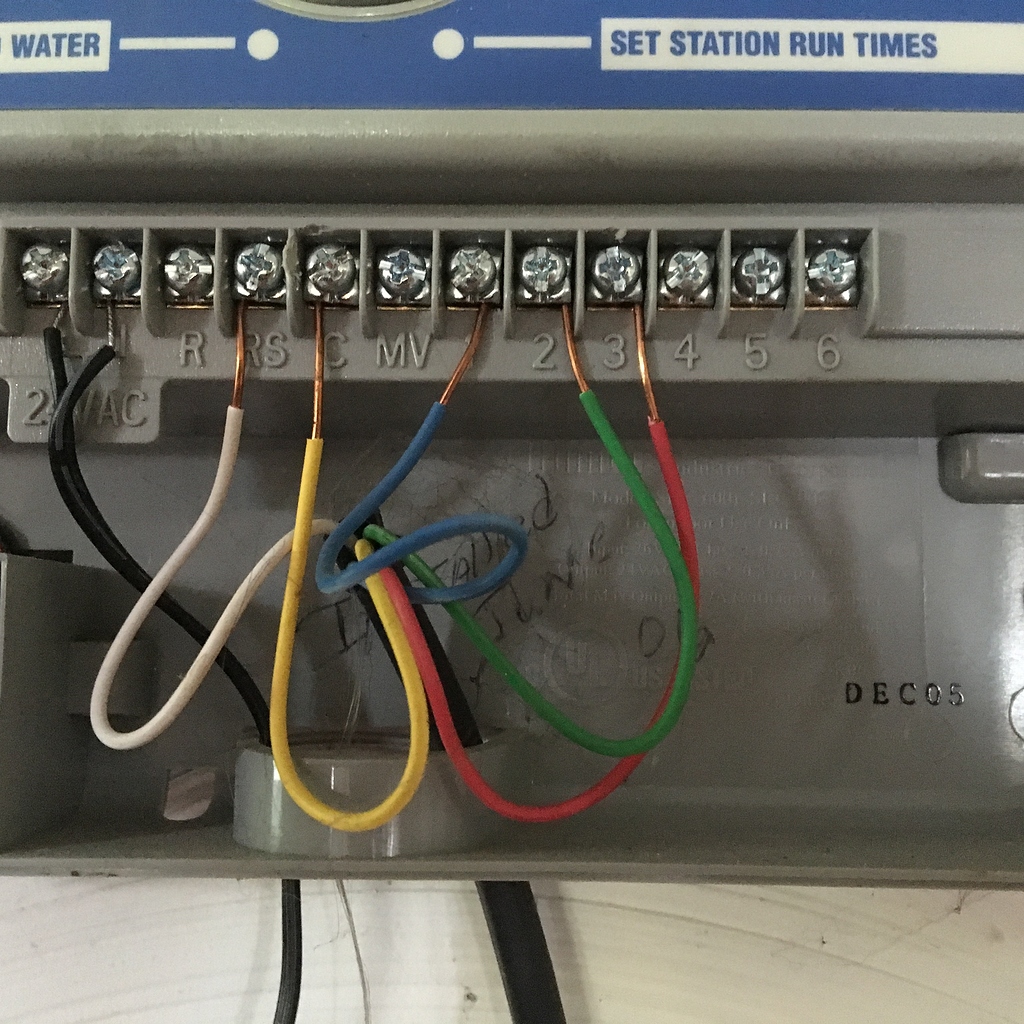
How To Wire Rain Bird Controller.60 or 240 (pro) type: Strip 1/2 inch of wire from one of the wires on the valve solenoid. At a glance, it also seems that you have a hardwired rain sensor on the rightmost brown cable, that’s the one with red & white wires in use, with green & blue wires cut.
How To Wire Rain Bird Controller. To enable wifi control from your mobile device, just inst. This allows you to easily override the sensor by using the sensor switch on the front panel. Connect it to the master valve and to the com terminal on the timer. Next, remove the old control panel and mount the new one as directed. Start by reconnecting the wires, using the photo you took as a reference.
How To Wire Rain Bird Controller. This allows you to easily override the sensor by using the sensor switch on the front panel. Maps the devices to corresponding wire paths in the controller to help quickly find and resolve issues. Connect both rain sensor wires to the sensor terminals as shown.
How To Wire Rain Bird Controller. 60 or 240 (pro) type: The sensor activation switch on the controller is set to the desired on/off position. Remove the red jumper wire from the two “sen”.
How To Wire Rain Bird Controller: See How Easy It Is To Install And Program A Rain Bird Sst Series Automatic Sprinkler Timer.shop Rain Bird Online:
At a glance, it also seems that you have a hardwired rain sensor on the rightmost brown cable, that’s the one with red & white wires in use, with green & blue wires cut. Match each numbered lug with the right color. Manual station, program, test program.
How To Wire Rain Bird Controller: The Pump Start Relay Easily Connects To Your Timer In Two Locations, Using Normal Irrigation Valve Wire.
60 or 240 (pro) type: Connect it to the master valve and to the com terminal on the timer. Any pump start relay wired to an irrigation controller should have all unused station wires connected to the last used station wire.
How To Wire Rain Bird Controller: Flow Sensing Is Standard On Esplxmef Model Controllers.
Select one colored wire from the cable and strip 1/2 inch of insulation from the wire. Start by reconnecting the wires, using the photo you took as a reference. Strip 1/2 inch of wire from one of the wires on the valve solenoid.
How To Wire Rain Bird Controller: Note That The Wires That.
To enable wifi control from your mobile device, just inst. Next, remove the old control panel and mount the new one as directed. Do not route the rain.
How To Wire Rain Bird Controller: Unscrew The Wire Terminal Marked C Part Way And Slide The White Wire Behind The Metal Plate Secured By The Screw.
This allows you to easily override the sensor by using the sensor switch on the front panel. Remove the red jumper wire from the two “sen”. The sensor activation switch on the controller is set to the desired on/off position.
How To Wire Rain Bird Controller.Tighten the screw to clamp the white wire behind the plate. See how easy it is to install and program a rain bird sst series automatic sprinkler timer.shop rain bird online: Flow sensing is standard on esplxmef model controllers.
How To Wire Rain Bird Controller.Start by reconnecting the wires, using the photo you took as a reference.
How To Wire Rain Bird Controller: See How Easy It Is To Install And Program A Rain Bird Sst Series Automatic Sprinkler Timer.shop Rain Bird Online:
At a glance, it also seems that you have a hardwired rain sensor on the rightmost brown cable, that’s the one with red & white wires in use, with green & blue wires cut. Match each numbered lug with the right color. Manual station, program, test program.
How To Wire Rain Bird Controller: The Pump Start Relay Easily Connects To Your Timer In Two Locations, Using Normal Irrigation Valve Wire.
60 or 240 (pro) type: Connect it to the master valve and to the com terminal on the timer. Any pump start relay wired to an irrigation controller should have all unused station wires connected to the last used station wire.
How To Wire Rain Bird Controller: Flow Sensing Is Standard On Esplxmef Model Controllers.
Select one colored wire from the cable and strip 1/2 inch of insulation from the wire. Start by reconnecting the wires, using the photo you took as a reference. Strip 1/2 inch of wire from one of the wires on the valve solenoid.
How To Wire Rain Bird Controller: Note That The Wires That.
To enable wifi control from your mobile device, just inst. Next, remove the old control panel and mount the new one as directed. Do not route the rain.
How To Wire Rain Bird Controller: Unscrew The Wire Terminal Marked C Part Way And Slide The White Wire Behind The Metal Plate Secured By The Screw.
This allows you to easily override the sensor by using the sensor switch on the front panel. Remove the red jumper wire from the two “sen”. The sensor activation switch on the controller is set to the desired on/off position.
0 Komentar